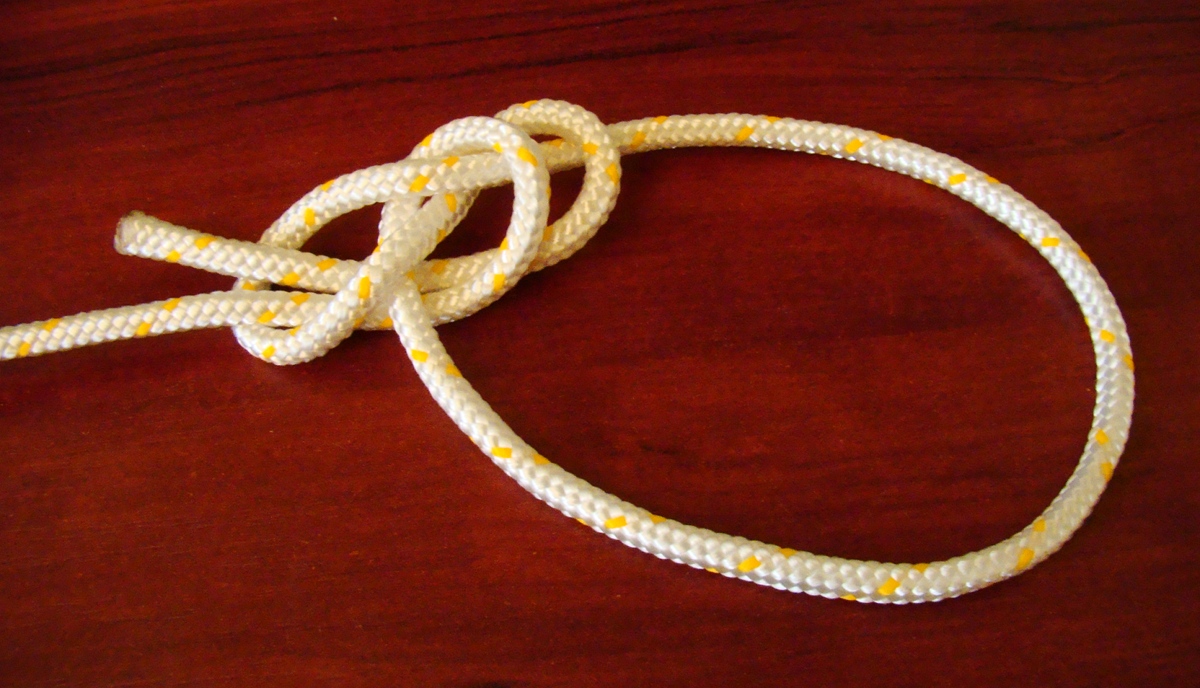
1 Thumb knot or The overhand knot holds a central role in the world of knots, serving as the foundation for various other knot types, including the uncomplicated noose, overhand loop, angler's loop, reef knot, fisherman's knot, half hitch, and water knot. This knot is particularly effective as a stopper on its own, offering exceptional security to the extent that it can become difficult to untie. It is ideal for situations where a permanent knot is required and is frequently employed to prevent the unraveling of a rope's end. By joining its loose ends, the overhand knot transforms into a trefoil knot, a true mathematical knot. Additionally, it can be adapted, smoothed, or mistakenly tied as a half hitch The overhand knot holds a central role in the world of knots, serving as the foundation for various other knot types, including the uncomplicated noose, overhand loop, angler's loop, reef knot, fisherman's knot, half hitch.d wat

er knot. This knot is particularly effective as a stopper on its own, offering exceptional security to the extent that it can become difficult to untie. It is ideal for situations where a permanent knot is required and is frequently employed to prevent the unraveling of a rope's end. By joining its loose ends, the overhand knot transforms into a trefoil knot, a true mathematical knot. Additionally, it can be adapted, smoothed, or mistakenly tied as a half hitc2 Double Thumb knot or The double overhand knot, also commonly referred to as the thumb knot, serves as a practical stopper knot with various applications. Its primary purpose is to secure a rope, preventing it from slipping through an opening roughly equivalent to the rope's diameter. Additionally, it acts as a safeguard against fraying or unraveling at the rope's ends.
To execute a double overhand knot, follow these steps:
1. Create a loop at the rope's end.
2. Insert the tail end of the rope through the loop once.
3. Pass the tail end of the rope through the loop once more.
4. Apply tension to both the tail end and the standing portion of the rope.
5. Neatly arrange and tighten the knot.
Differentiating it from the basic overhand knot, the double overhand knot shares a similar tying technique but involves an extra pass through itself. This results in a knot that is bulkier and more resistant to untying compared to its simpler counterpart.


3 . Water knot The water knot, alternatively known as the tape knot, ring bend, grass knot, or overhand follow-through, is a knot commonly employed in climbing to connect two segments of webbing. To properly tie a water knot, follow these steps:

4 Nose knot
A noose is a closed loop formed at the terminus of a rope. This loop possesses the unique quality of constricting when subjected to tension, yet it can be easily slackened without requiring a complete untying of the knot. This knot finds utility in fastening a rope to various objects such as posts, poles, or even animals, as long as the rope's extremity is suitably positioned to allow the loop's passage over it.

5 Chain sinnet
A chain sinnet, also known as a daisy chain, monkey chain, or monkey braid, is a knotting technique employed to shorten ropes or cables. Crafting a chain sinnet entails forming a slip knot in the rope and subsequently inserting a bight into the loop. This process is repeated until the desired chain length is achieved. Upon reaching the desired length, the chain is secured by threading the end through the final loop.
Chain sinnets serve various practical purposes, including:
1. Climbing
2. Outdoor activities
3. Neatly storing extension cords
4. Minimizing tangling when washing a rope in a washing machine
Furthermore, chain sinnets can also be employed for decorative applications, such as embellishing military uniforms.

6 Reef knot
A reef knot, alternatively referred to as a square knot or Hercules knot, is a straightforward binding knot designed to secure a rope or line around an object. Its applications range from tying parcels, rolls, and bundles to maritime uses such as reefing and furling sails and suspending clothes for drying.
To execute a reef knot, follow these steps:
1. Align the two ends of the same cord, positioning the right end over the left.
2. Form a half knot by tying the right end over the left.
3. Then, bring the two ends back together, but this time, cross the left end over the right.
4. Create a second half knot by tying the left end over the right.
The resulting reef knot exhibits symmetry, featuring two single knots that have been tied in opposite directions. In contrast, a granny knot consists of a double knot where both single knots are tied in the same direction. While granny knots are more resistant to deliberate untying, they often have a tendency to spontaneously slip under tension.

7 Thief knot
The thief knot, also known as the bag knot or bread bag knot, bears a resemblance to the square knot. However, it distinguishes itself by having its free ends situated on opposing sides. Its primary purpose is to securely join two ropes, exhibiting a resemblance to the reef knot but with the crucial distinction of having its short ends positioned in opposing directions. It's worth noting that the thief knot is less robust than the reef knot; when subjected to tension, it has a tendency to self-untie, a characteristic that would cause a reef knot to grip firmly.
This knot holds a historical significance among sailors who utilized it to fasten their clothing bags or bread bags. Notably, they often concealed the loose ends, and in the event that another sailor examined the bag, the culprit would probably re-tie it using the more conventional reef knot. This act of retying would inadvertently reveal any tampering, hence the knot's intriguing moniker.
To execute a thief knot, follow these steps:
1. Begin by creating a bight at one end of the rope.
2. Insert the opposite end through the bight, then proceed to wrap it around both strands of the other end.
3. Next, insert the working end back into the bight, ensuring that it lies alongside its own standing line.
4. Simultaneously pull all parts of the knot to cinch it tight and secure

8 Granny knot
The granny knot serves as a knotting technique employed for securing a rope or line around an object. While it shares similarities with the square knot, it's generally regarded as less reliable. Comprising six crossings, this composite knot consists of two left-handed trefoils with matching orientations. It also goes by various aliases such as booby knot, calf knot, lubbers knot, or false knot.
The term "granny knot" is believed to have originated from its historical application in tying the necks of sacks in granaries. Notably, it is a common culprit for shoelaces coming undone or loosening.
This type of knot is relatively straightforward to untie. To create a granny knot, follow these steps:
1. Grasp both ends of the line you intend to fasten.
2. Loop the left end over the right.
3. Form additional loops with the knot ends.
4. Adjust the knot as needed.

Hitche's
9 Half hitch
Mastering the Half Hitch: A Knot Enthusiast's Guide
Introduction:
Knots are an essential skill for anyone who ventures into the great outdoors, whether you're an avid camper, a sailor, or just a DIY enthusiast. Among the plethora of knots at your disposal, one of the simplest yet versatile ones is the half hitch. In this blog post, we'll delve into the world of half hitches, exploring their construction, applications, and how they form the building blocks of more complex knots.
The Anatomy of a Half Hitch:
A half hitch is a fundamental knot formed by looping the working end of a rope around an object, crossing it over the main part of the rope, and passing it through the resulting loop. Think of it as a cousin to the overhand knot, known for its simplicity and ease of creation. However, on its own, a half hitch lacks security. It's the team player of the knot world, often utilized in pairs or as a component within more reliable knots.
Tying a Half Hitch:
To tie a basic half hitch, follow these steps:
1. Pass the working end of the rope around the object you want to secure.
2. Tie a simple overhand knot by looping the working end over the standing part and threading it through the loop.
Enhancing the Reliability:
While a single half hitch may suffice for light-duty tasks, you can make it more dependable in two ways:
1. Double It Up: For added security, create a two half hitches knot by repeating the steps above. This double layer ensures a firmer grip.
2. Add a Stop Knot: To prevent accidental unraveling, incorporate a stop knot after your half hitch. A stop knot is a small, tight overhand knot placed at the end of the working rope, ensuring your half hitch won't slip.
Applications of the Half Hitch:
Now that you've mastered the basics, let's explore where half hitches come in handy:
1. Securing to Objects: Half hitches are frequently used to attach a rope to various objects, such as hitching posts, tent pegs, or tree branches. Their simplicity makes them a quick go-to choice for these tasks.
2. Building Complex Knots: A half hitch serves as the initial step in forming a square (reef) knot, a versatile and widely used binding knot. By mastering the half hitch, you're well on your way to mastering more intricate knots.
Conclusion:
In the world of knots, the humble half hitch plays a vital role. While it may seem straightforward on its own, its versatility and importance in crafting more secure knots cannot be overstated. Whether you're securing your tent or setting sail on the open water, understanding the half hitch is a fundamental skill every knot enthusiast should possess. So, practice your half hitches, and you'll soon find yourself knotting with confidence in various outdoor adventures.
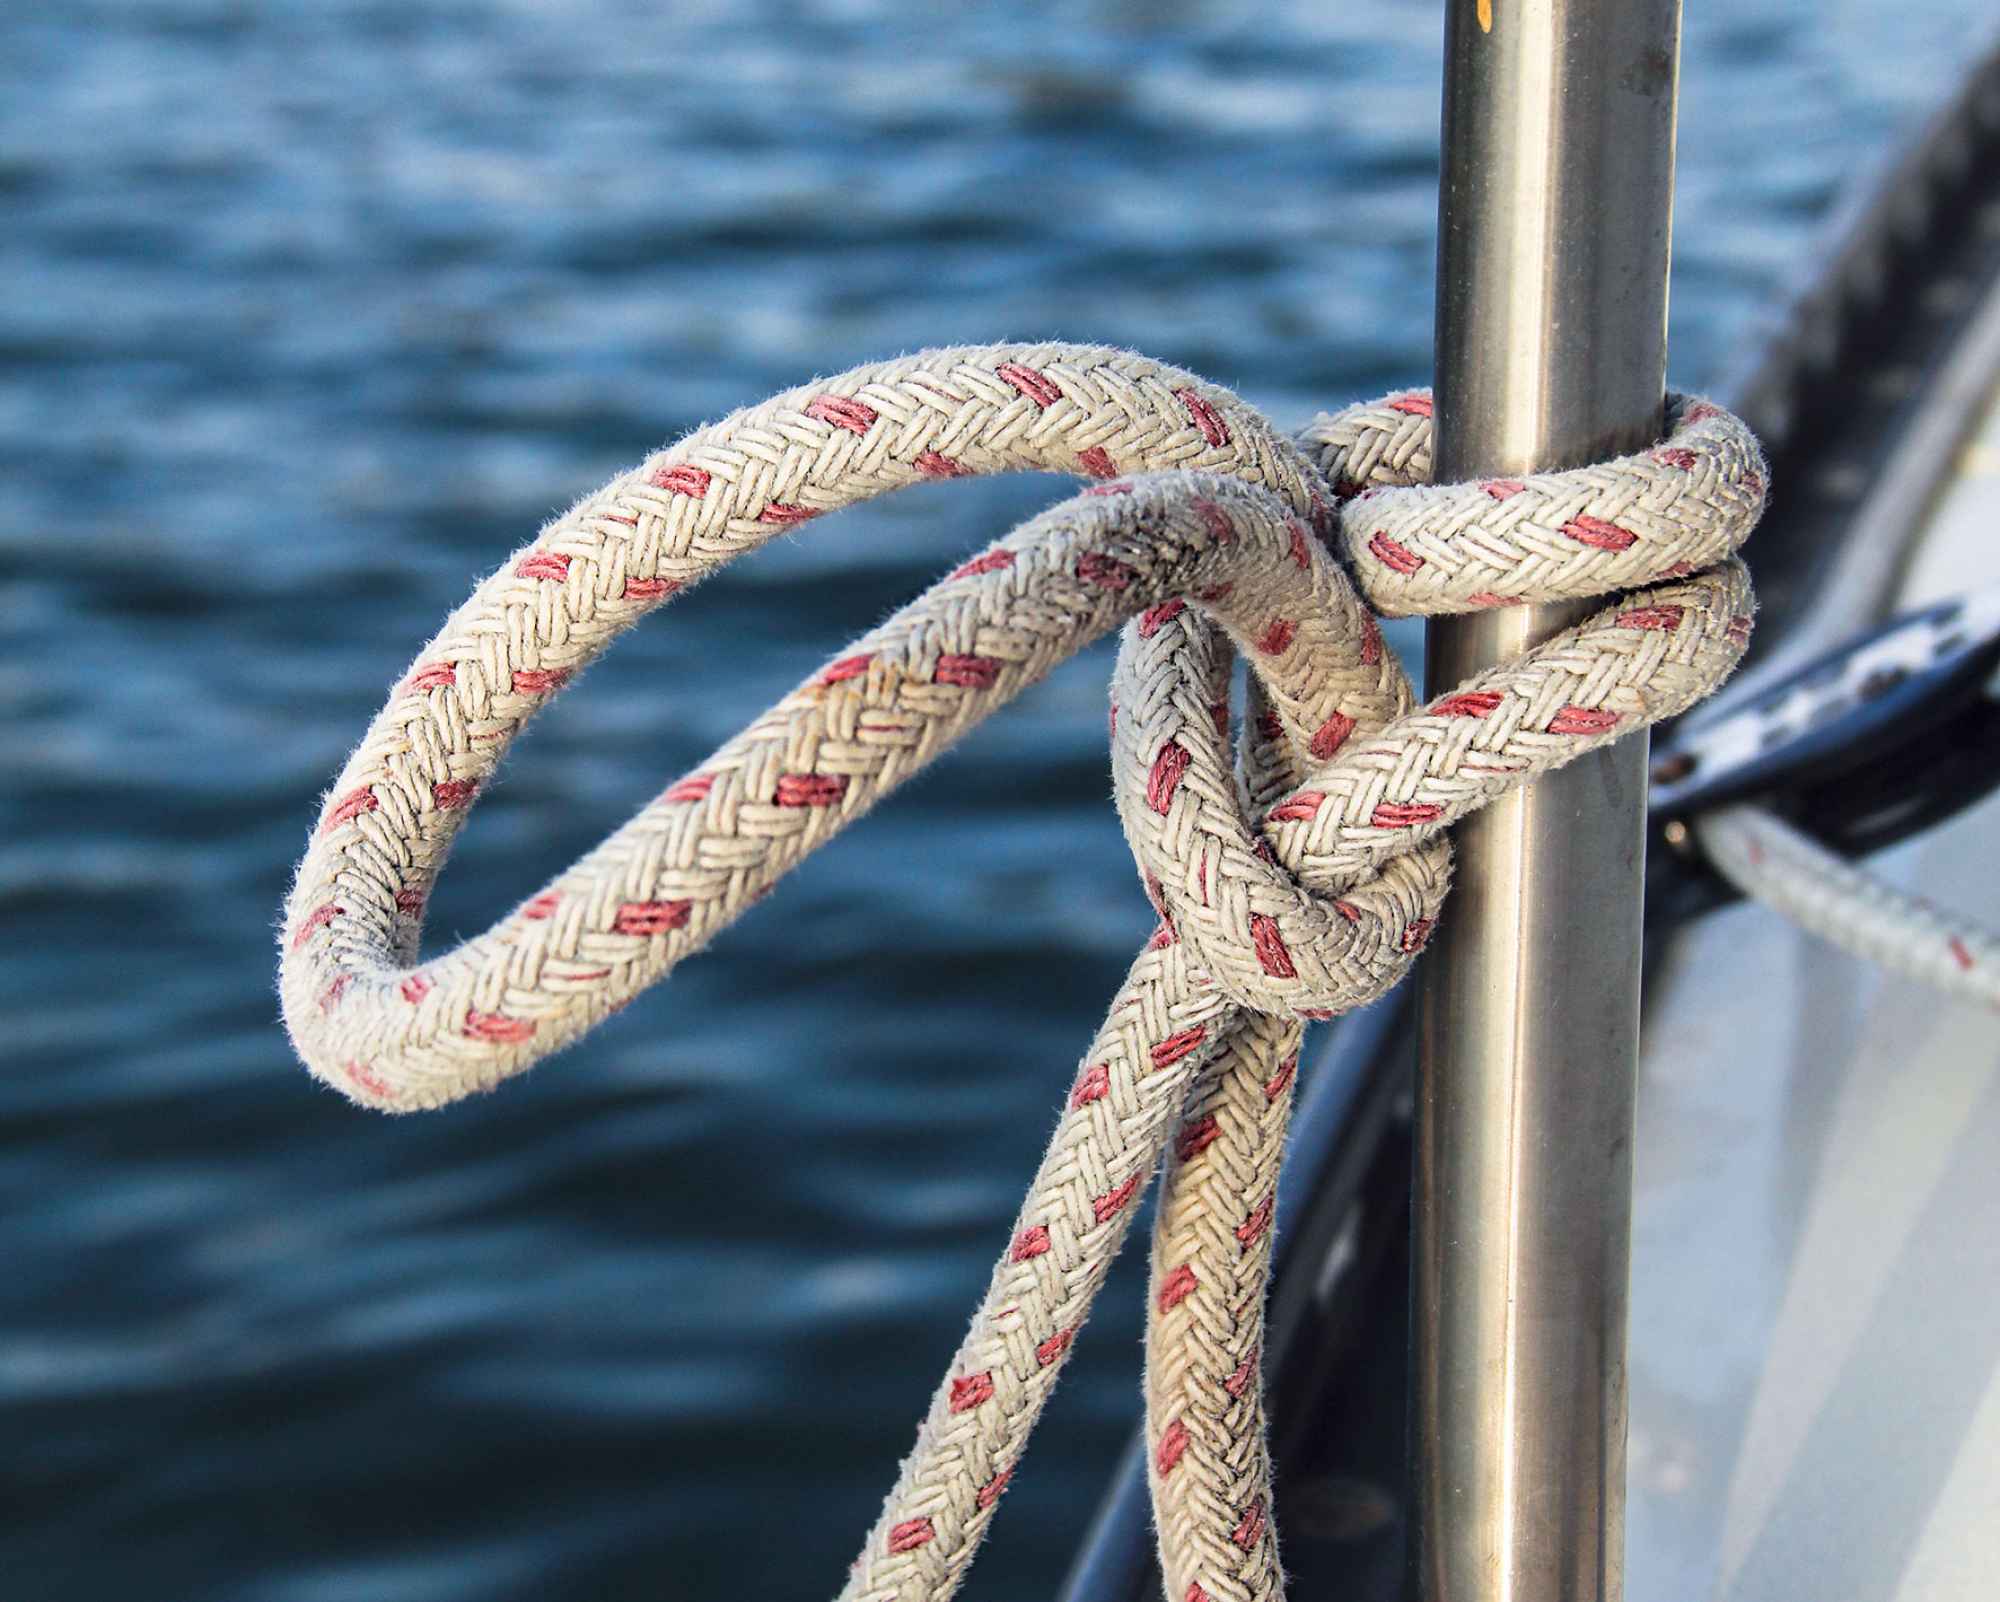
10 -- Clove hitch
Mastering the Clove Hitch Knot: A Versatile Essential for Knot Enthusiasts
Intro:
The clove hitch, known by various names like the builder's knot or ratline hitch, is a fundamental knot every enthusiast should have in their repertoire. Its versatility makes it a valuable tool in a wide range of situations, from securing a middle section of rope to an object to anchoring yourself during mountaineering adventures. In this blog post, we'll explore the ins and outs of tying a clove hitch while highlighting its practical applications in boating, sailing, and more.
The Clove Hitch Knot Unveiled:
The clove hitch is a simple yet crucial knot consisting of two successive single hitches wrapped around an object. This knot is particularly handy for securing a rope to an object it crosses over, such as a line on a fencepost. Often considered one of the "big three" knots, alongside the bowline and sheet bend, mastering the clove hitch is a valuable skill for any knot enthusiast.
Tying the Clove Hitch Knot:
Tying a clove hitch is a straightforward process that you can master with practice. Here's a step-by-step guide:
1. Begin by passing the rope's end around the object you want to secure.
2. Cross the rope's end over the rope's standing part to form a loop.
3. Pass the rope's end around the object once more, making sure to maintain the loop.
4. Slip the working end of the rope underneath your last wrap. This will create a secure hitch.
5. Give the working end a firm pull to tighten the clove hitch securely in place.
Applications of the Clove Hitch Knot:The clove hitch knot finds practical use in various scenarios, including:
1. Mountaineering: Use it to fix a rope to a carabiner or secure yourself to an anchor, ensuring safety during your climbing adventures.
2. Boating and Sailing: Whether for temporary holds like securing stage scenery or mooring buoys, the clove hitch knot is a reliable choice for marine enthusiasts.
Conclusion:
In the world of knots, the clove hitch stands tall as an essential skill. Its simplicity, versatility, and reliability make it a go-to knot for securing ropes and ensuring safety in various outdoor activities. Whether you're an aspiring mountaineer, a seasoned sailor, or simply someone who appreciates the art of knot-tying, mastering the clove hitch is a valuable addition to your skill set. So, practice away and add this knot to your arsenal of outdoor expertise.

11 -- Constrictor hitch
The constrictor hitch, sometimes referred to as the constrictor knot, is a versatile binding knot cherished for its simplicity and reliability, though it should be noted that it can be quite challenging to undo once tightened. In many ways, the constrictor knot bears a resemblance to the clove hitch, with a slight variation in its tying method.
To master the art of tying a constrictor knot, follow these steps:
1. Begin by wrapping the end of your rope around the object you intend to secure.
2. Next, cross the rope over the standing end, encircling the object for a second time.
3. Now, tuck the loose end under itself and then beneath the first loop, completing the formation of the knot.
The constrictor knot serves a variety of practical purposes. It can be employed as a temporary solution to bind and protect frayed rope ends effectively. Additionally, it proves invaluable as a clamp when bonding pieces of wood together, or in emergency situations, it can even serve as an impromptu hose clamp for your vehicle.
Whether you're a seasoned knot enthusiast or just delving into the world of knot-tying, mastering the constrictor hitch can be a valuable addition to your skill set. Its reliability and versatility make it a go-to choice for a wide range of applications. So, next time you find yourself in need of a sturdy and dependable knot, consider giving the constrictor hitch a try.

12 -- The constrictor hitch, sometimes referred to as the constrictor knot, is a versatile binding knot cherished for its simplicity and reliability, though it should be noted that it can be quite challenging to undo once tightened. In many ways, the constrictor knot bears a resemblance to the clove hitch, with a slight variation in its tying method.
To master the art of tying a constrictor knot, follow these steps:
1. Begin by wrapping the end of your rope around the object you intend to secure.
2. Next, cross the rope over the standing end, encircling the object for a second time.
3. Now, tuck the loose end under itself and then beneath the first loop, completing the formation of the knot.
The constrictor knot serves a variety of practical purposes. It can be employed as a temporary solution to bind and protect frayed rope ends effectively. Additionally, it proves invaluable as a clamp when bonding pieces of wood together, or in emergency situations, it can even serve as an impromptu hose clamp for your vehicle.Whether you're a seasoned knot enthusiast or just delving into the world of knot-tying, mastering the constrictor hitch can be a valuable addition to your skill set. Its reliability and versatility make it a go-to choice for a wide range of applications. So, next time you find yourself in need of a sturdy and dependable knot, consider giving the constrictor hitch a try.
13 -- Cow hitch
The Cow Hitch: A Versatile Knot for Securely Fastening Ropes
When it comes to securing a rope to an object, the cow hitch is a knot that should be in every adventurer's toolkit. Also known as the lanyard hitch, girth hitch, or ring hitch, this knot offers both versatility and ease of tying. Whether you're connecting loop-ended lanyards to handheld electronic equipment or ensuring that loops of cable stay firmly attached to the backs of pick-up trucks during heavy-duty moves, the cow hitch has got you covered.
What makes the cow hitch so practical is its simplicity. It essentially consists of a pair of half-hitches tied in opposite directions. You can use the end of the rope or a bight (the slack middle section of a rope) to tie it, giving you flexibility in various situations.
Here's a step-by-step guide to tying the cow hitch:
1. Start by wrapping the end of the rope around the object from behind.
2. Cross the rope behind the standing line.
3. Next, wrap the tag end of the rope around the object in the opposite direction as the first wrap.
4. Feed the tag end through the opening created by the wrap.
5. Finally, pull both ends of the rope to tighten the knot securely in place.
Interestingly, the cow hitch is also known as the lark's head, which is a direct translation from the French term "tête d'alouette." Whether you call it a cow hitch or a lark's head, mastering this knot will prove invaluable in various outdoor and DIY scenarios.
So, next time you need a reliable knot for fastening ropes or cables, remember the cow hitch – a knot that combines simplicity with effectiveness. It's your trusty companion for all your securing needs, from outdoor adventures to practical everyday tasks.

14 -- Prusik hitch
Discover the Prusik Hitch: A Versatile Knot for Climbing and More
Are you an adventurer, a climber, or someone who enjoys outdoor activities like canyoneering, mountaineering, caving, or rope rescue? If so, you've likely heard of the Prusik hitch. This ingenious friction hitch or knot is a must-know for anyone navigating ropes in challenging terrain. In this blog post, we'll introduce you to the Prusik hitch, its uses, and its fascinating history.
What is a Prusik Hitch?
The Prusik hitch serves as both a knot and a loop of cord used to secure it around a rope. This versatile tool finds applications in various outdoor activities, including ziplining and arboriculture. But it doesn't stop there; it's also handy for rope rescue operations.
Origin of the Prusik Hitch
The name "Prusik" is a nod to its inventor, the Austrian mountaineer Karl Prusik. Back in 1931, this hitch made its debut in an Austrian mountaineering manual as a reliable method for ascending ropes. Climbers of the time used it to conquer summits by throwing a rope over the top and anchoring it. Then, they would ascend the other side using the Prusik hitch.
Using the Prusik Hitch
The Prusik hitch is incredibly versatile and user-friendly. It's designed to grip onto a rope securely, allowing climbers to ascend safely. The term "to Prusik" has become synonymous with using this hitch to make vertical progress.
Why Choose a Prusik Hitch?
One of the standout features of the Prusik hitch is its rope-friendly nature. When made from cord, it typically doesn't cause any significant damage to the rope it's attached to. This is in contrast to some mechanical ascenders that can potentially harm the rope during use, especially if they slip or are subjected to heavy loads or sudden shocks.
Common Misspellings and Variations
Due to its pronunciation, the term "Prusik" is often misspelled as "Prussik," "Prussick," or "Prussic." However, regardless of how you spell it, the utility and effectiveness of this knot remain unchanged.
In conclusion, the Prusik hitch is a valuable tool for adventurers and climbers alike. Its ability to securely grip ropes without causing damage makes it a must-have knot for various outdoor activities. Whether you're ascending a mountain, exploring a cave, or engaging in rope rescue operations, the Prusik hitch is a reliable companion in your journey. So, the next time you embark on an outdoor adventure, consider adding this versatile knot to your skill set.

15 -- Klemheist hitch
Discover the Versatile Klemheist Knot: Your Ultimate Tool for Rock Climbing and Mountaineering"
If you're a rock climbing or mountaineering enthusiast, you've likely heard of the Klemheist knot, also known as the French Machard knot. This remarkable friction hitch knot has become a must-know technique for outdoor adventurers. Why? Because it's a game-changer in the world of autoblock knots.
The Klemheist knot boasts a unique feature: it stays put when loaded, preventing any unwanted sliding along the rope. Plus, it's easily adjustable when there's no load on it. Whether you're ascending or descending a climbing line, this knot has got you covered. In this blog post, we'll delve into the ins and outs of the Klemheist knot, from its origin as a Prusik knot derivative to its compatibility with various materials, including cord and nylon webbing.
So, let's embark on a journey to uncover the secrets of this versatile knot, and how it can elevate your climbing and mountaineering adventures. We'll also explore its applications with sewn slings, providing you with all the knowledge you need to master this essential technique.
Stay tuned for a comprehensive guide on tying, using, and benefiting from the incredible Klemheist knot in your outdoor pursuits.

16 -- Highwayman's hitch
Introducing the Highwayman's Hitch: Your Quick-Release Knot for Versatile Use
Have you ever needed a quick and reliable way to secure a load temporarily? Look no further than the Highwayman's Hitch, also known as the Fireman's Hitch. This knot is a handy tool for a variety of situations, whether you're securing horses, temporarily mooring a small boat, or tackling other similar tasks.
What makes the Highwayman's Hitch particularly versatile is its ability to be tied in the middle of a rope. This means you don't have to wrap the working end around the anchor when tying or releasing the knot. Let's walk through how to tie this useful hitch step by step:
1. Begin by taking a bight of the rope behind the support you're working with.
2. Pass another bight through the initial loop you created.
3. Follow up by passing yet another bight through the loop you've just made.
4. To secure your load, simply pull the top loop and the standing part of the rope tight.
One of the standout features of the Highwayman's Hitch is its ease of untying, even when the rope is under tension. It offers the convenience you need in various situations. However, it's essential to note that this hitch may not be suitable for extreme loads and should not be relied upon in critical lifesaving applications.
Incorporate the Highwayman's Hitch into your toolkit for those moments when a quick-release knot is the answer to your needs. Its versatility and ease of use make it a valuable addition to any outdoor enthusiast's repertoire. Stay prepared and secure with the Highwayman's Hitch at your disposal.

17 -- Draw hitch
Mastering the Quick-Release Draw Hitch: Versatile and Reliable Knots for Every Situation
Intro:
The draw hitch, also known as the Fireman's Hitch and the Highwayman's Hitch, is a versatile knot that not only holds a considerable amount of strain but can also be easily released with a simple tug. While its intriguing history may be shrouded in legend, its practicality in various scenarios is undeniable. In this blog post, we'll explore the draw hitch's uses, advantages, and how it can be your go-to knot for securing items, whether you're a boating enthusiast or a pioneer at heart. Plus, we'll ensure it's SEO-friendly, so you can quickly find all the information you need.
Section 1: The Draw Hitch Unveiled
Introduction to the Draw Hitch: Delve into the basics of the draw hitch, its alternative names, and its intriguing historical background.
Why Choose the Draw Hitch: Highlight its key features, such as reliability, ease of use with one hand, and its ability to secure items like boats or horses effortlessly.
2: Practical Uses of the Draw Hitch
Securing Your Boat :Explore how the draw hitch is an ideal choice for securely mooring your boat and ensuring a hassle-free departure when needed.
Pioneering Applications: Discover its utility in pioneering scenarios, such as hoisting large structures, and how it simplifies the process of removing lines with a quick tug.
3: Tying the Draw Hitch – Step by Step
Step-by-Step Guide:Provide easy-to-follow instructions for tying the draw hitch, starting from the left and right, ensuring that both beginners and experienced knot enthusiasts can master it.
Visual Aids: Include clear, SEO-friendly images that guide readers through the knot-tying process.
4: Conclusion
Master the Draw Hitch: Summarize the draw hitch's practicality and versatility, encouraging readers to add it to their knot-tying repertoire.
Ready for Action: Remind readers that with the draw hitch, they can secure items and be on their way quickly, all with a simple tug.
By crafting a blog post structured around these sections, you'll not only inform your readers about the draw hitch but also optimize it for SEO, making it easily discoverable for those seeking knot-tying expertise.

18 -- Lighterman's hitch
Mastering the Tugboat Hitch or Lighterman's hitch: Your Ultimate Guide to Heavy Towing and Secure Mooring"
Introduction:
When it comes to heavy towing or securing your vessel to a post, bollard, or winch, there's a knot that stands out as a true lifesaver: the Tugboat Hitch, also known as the Lighterman's Hitch. Not only is it exceptionally strong, but it's also incredibly easy to release, even when under immense load. In this blog post, we'll take you through the steps of tying this versatile knot and share some expert tips to make your maritime endeavors a breeze.
Tying the Tugboat Hitch:
1. Starting Strong: To begin, take a single turn or a round turn around the post, ensuring a firm anchor point.
2. Creating the First Bight: Pass a bight (a U-shaped bend) under the standing part of the rope. This is your initial step in building the Tugboat Hitch's strength.
3. Over the Top: Now, gently drop the first bight over the top of the post. This ensures a secure hold and sets the foundation for the knot.
4. Balancing Act: On the other side of the standing part, create another bight in the rope and drop it over the post as well. It's crucial to note that in each placement of the bight over the post, the end's side of the bight should lead to the side away from the standing part. This little trick will make releasing the knot a breeze when the time comes.
5. Repetition Matters: Continue this repetition as necessary until you feel that your load is securely held. Typically, three bights should suffice, but adjust as needed for the weight and conditions.
6. Finishing Touch: To complete the Tugboat Hitch, finish by half-hitching a bight around the standing part or make a round turn around the post. This final step ensures that your knot stays put, especially when dealing with heavy loads.
Pro Tips:
Load Matters: When dealing with heavy loads, it's crucial to have made enough bights and turns to distribute the force evenly. This not only adds to the knot's strength but also makes untying (releasing) the hitch much more manageable.
Safety First: Always prioritize safety when using the Tugboat Hitch. Ensure that your knot is secure before relying on it for towing or mooring. Regularly inspect the knot for signs of wear or slipping.
Conclusion:
The Tugboat Hitch, or Lighterman's Hitch, is a knot that every maritime enthusiast should have in their repertoire. Its strength and ease of release make it a top choice for heavy towing and secure mooring. By following the simple steps outlined in this guide and keeping our pro tips in mind, you'll be well-prepared to tackle even the most challenging maritime tasks. Happy knot-tying!

19 -- Bowline
The Bowline Knot: Your Trusty Companion for Adventure
When you're out on an adventure, whether it's sailing the high seas or embarking on a thrilling expedition, having the right tools at your disposal can make all the difference. One such tool is the humble yet indispensable Bowline Knot, often hailed as "The King of Knots." In this blog post, we'll explore how this versatile knot can be your go-to companion for various adventure scenarios
The Bowline Knot: A Knot Fit for Adventure
The Bowline Knot is a remarkable knot that forms a secure loop at the end of a rope. Its versatility knows no bounds, making it a valuable asset in the world of adventure. Here's why it's a must-know for any adventurer:
1. Secure and Reliable
Whether you're mooring boats, hoisting equipment, hauling gear, or fastening ropes together, the Bowline Knot has got you covered. Its strength and reliability ensure that your gear stays in place, no matter the conditions you face.
2. Quick and Easy
In the midst of adventure, time is of the essence. The Bowline Knot's simplicity ensures that you can tie and untie it swiftly, even when you're under pressure. This ease of use can be a game-changer when you need to act fast.
3. Endurance Tested
Adventure often pushes your equipment to the limit. The Bowline Knot's remarkable feature is its ability to maintain its integrity even after bearing a substantial load. You can trust it to hold up when you need it most.
4. A Connection to History
The Bowline Knot isn't just a practical tool; it's steeped in history. This knot has been in use for centuries, possibly even gracing the decks of legendary ships like those of the Egyptian Pharaoh Khufu. Embracing the Bowline Knot connects you to a tradition of seafaring and exploration that spans millennia.
5. Adventure on the High Seas
Beyond its knot-tying role, the term "bowline" also refers to a vital rope used in sailing. This rope runs from the middle of a square sail to the bow of a ship, keeping the sail taut when sailing into the wind. It's a testament to the knot's importance in the world of adventure, especially when conquering the open waters.
In conclusion, the Bowline Knot is more than just a knot; it's a steadfast companion on your adventurous journeys. Its versatility, reliability, and historical significance make it a valuable tool for adventurers of all kinds. So, whether you're setting sail into uncharted waters or embarking on a daring expedition, make sure to have the Bowline Knot in your arsenal—it's the key to a secure and unforgettable adventure.

20 -- Yosemite bowline
Exploring the Yosemite Bowline: A Secure Knot for Your Adventure Needs
When it comes to outdoor adventures, safety is paramount. One crucial aspect of adventure preparedness is knowing your knots, and the Yosemite Bowline is a knot worth getting to know. It's a variation of the classic bowline knot but with an added layer of security that adventurers often find reassuring. In this article, we'll delve into the Yosemite Bowline, explore its unique Yosemite finish, and discuss its applications in the adventurous world of climbing and more.
The Yosemite Bowline: A Knot of Extra Security
The Yosemite Bowline is a loop knot celebrated for its enhanced security compared to the standard bowline. What sets it apart is the addition of the Yosemite finish, an extra knot that bolsters its strength and prevents it from inadvertently transforming into a slip knot. This added layer of protection ensures that even under significant loads, the knot remains steadfast.
One of the key benefits of the Yosemite Bowline is its ability to constrict its own tail-end when tightened under pressure. This self-constriction minimizes the risk of the knot weakening due to the absence of a stopper knot, offering adventurers greater peace of mind in challenging situations.
An Adventurer's Knot: The Yosemite Bowline in Climbing
For climbers and adventure seekers, the Yosemite Bowline serves as a reliable alternative tie-in knot. However, it's important to note that, like any knot, it requires proper dressing to ensure safety. If not correctly dressed, there is a potential risk of it collapsing into a noose, which can have serious consequences.
To tie a Yosemite Bowline, follow these steps:
1. Get a Grip: Begin by holding the rope firmly in your dominant hand.
2. Cross and Loop: Cross the rope over your standing line, creating a loop.
3. Under and Through: Reach under your standing line, pull the rope through, and send it back in.
4. Pinch and Open: Pinch everything together and open up the loop.
5. Outside and Back: Go outside the loop, then back down and send the rope right back out.
6. Tighten Up: Finally, tighten all the elements of the knot, ensuring it's secure.
Knot Mastery for Adventure Enthusiasts
In conclusion, the Yosemite Bowline is a knot that adventure enthusiasts should consider adding to their skill set. Its additional security features make it a valuable asset in various outdoor scenarios, including climbing and wilderness exploration. However, always remember that proper knot dressing is essential to ensure the knot functions as intended.
Stay safe, adventurers, and keep exploring the great outdoors with confidence, armed with the knowledge of the trusty Yosemite Bowline.
21 -- French/Portuguese bowline
The Adventure Enthusiast's Guide to the French (Portuguese) Bowline Knot
When it comes to outdoor adventures, knowing your knots is as essential as packing the right gear. Among the myriad of knots out there, the French Bowline, sometimes affectionately called the Portuguese Bowline, stands out as a versatile gem in the world of knot-tying. In this blog post, we'll explore this incredible knot's ability to create two adjustable loops at the end of your rope, making it a handy tool for adventurers of all kinds.
Unleash Your Inner RiggerPicture this: you're out in the wilderness, ready to tackle a challenging climb or rigging work, and you need a dependable knot to secure your gear. Enter the French Bowline. This knot isn't just any knot; it's a knot with a reputation. It's reliable, sturdy, and incredibly stable, making it a top choice for adventurers.
What sets the French Bowline apart from the crowd is its ability to minimize strain on your rope. Unlike some other knots that can weaken your line significantly, a well-tied French Bowline reduces rope strength by a mere 42%. Compare that to the 50% reduction of a sheet bend or the 55% reduction of a reef knot, and you'll quickly see why this knot is the adventurer's best friend.
More Than Just a Knot
But wait, there's more! The French Bowline isn't just about securing gear. It's a versatile knot that can wear many hats (or loops, in this case). Need a makeshift Bosun's chair for those breathtaking cliffside views? The French Bowline has you covered. Want to join two ropes together for added length or strength? You guessed it; this knot's got your back. Need to fasten those mooring lines securely as you set sail on your next aquatic adventure? The French Bowline is up to the task.
In the world of adventure, where every piece of equipment counts, having a knot like the French Bowline in your repertoire can make all the difference. So, next time you're out there exploring the great unknown, remember this trusty knot, and let it be your partner in adventure.
Whether you're a seasoned mountaineer, an avid sailor, or a wilderness explorer, the French Bowline knot is your secret weapon, ready to tackle any challenge nature throws your way. So, go ahead, tie it, trust it, and embark on your next thrilling adventure with confidence. Your knot-tying skills just got an upgrade!

22 -- Bowline on the bight
The Bowline on a Bight: Your Adventure Knot for Safety and Versatility
In the thrilling world of outdoor adventures, having reliable knots in your repertoire is paramount. Among these, the Bowline on a Bight stands out as a knot that can save the day when you find yourself in situations where accessing the rope ends isn't feasible. This knot is not only secure but also a fundamental skill taught by the esteemed German Alpine Club.
Let's delve into the exciting applications of the Bowline on a Bight that can enhance your outdoor escapades:
1. Creating a Mid-Rope Toe Hold: Imagine scaling a rocky cliff, and you need a secure foothold in the middle of your rope. The Bowline on a Bight comes to the rescue, allowing you to create a dependable toe hold for added stability during your ascent.
2. Crafting an Emergency Bosun's Chair:When an unexpected situation demands a makeshift seat, the Bowline on a Bight is your go-to knot. It can swiftly transform your rope into a secure and comfortable bosun's chair, providing a stable vantage point to assess your surroundings or perform necessary tasks.
3. Enabling Safe Hoisting: Whether you're in a rescue scenario or simply need to lift gear or a friend to a higher or lower point, the Bowline on a Bight is a trusty choice. It grants you the power to hoist with confidence, ensuring the safety of both yourself and those you're assisting.
Now, let's break down the steps to tie this essential knot for your adventure toolkit:
1. Create a Loop (Eye):Begin by doubling a section of your rope, forming a loop or "eye" in the line.
2. Thread the Free End: Pass the free end of the rope up through the eye, creating a double loop beneath the eye.
3. Loop Around and Through: Spread open the free end and bring it down to the bottom of the double loop. Then, pass it over the double loop and continue upward to the top of the eye.
4. Encircle the Knot: Open up the bight (the loop formed by the free end) and bring it around the entire knot until it encircles both standing ends of the rope.
5. Tighten Securely:To complete the Bowline on a Bight, make sure to tighten the knot firmly, ensuring its reliability in your adventure endeavors.
In your quest for outdoor excitement, having versatile skills like tying the Bowline on a Bight can make all the difference. Whether you're conquering cliffs, improvising a bosun's chair, or lending a helping hand in precarious situations, this knot is your steadfast companion. Remember, in the world of adventure, preparedness is key, and mastering essential knots like the Bowline on a Bight is a step toward safer, more enjoyable escapades. So, gear up, practice your knots, and embark on unforgettable journeys with confidence!

23 -- Figure of 8 knot
The Figure-Eight Knot: Your Trusty Adventure Companion
When you're out adventuring, be it sailing across open waters or scaling rocky cliffs, having a reliable knot in your repertoire can make all the difference. One such knot is the Figure-Eight Knot, often affectionately referred to as the Flemish Knot. This versatile stopper knot serves a crucial role in adventure sports, ensuring ropes stay securely in place and providing a quick and easy way to untie when needed.
Tying the Figure-Eight Knot: Simple and Effective
To tie a Figure-Eight Knot, follow these steps:
1. Begin by tying a single eight-shaped loop in the rope, approximately two feet from its end.
2. If desired, pass the free end through any available tie-in point.
3. Retrace the original eight shape with the free end, leaving a loop at the bottom of the desired size.
4. Pull all four strands of the rope to cinch down the knot firmly.
Versatility in Adventure
The Figure-Eight Knot serves as the foundation for several more intricate rock-climbing knots, making it a valuable skill for adventurers. In rock climbing, the Figure-Eight Follow-Through is the go-to tie-in knot. Not only is it easy to tie, but it's also exceptionally strong, eliminating the need for a backup knot. It retains an impressive 75 to 80% of the rope's strength, ensuring your safety while you conquer new heights.
Whether you're setting sail or embarking on a daring climb, the Figure-Eight Knot is your reliable adventure companion, ready to secure your ropes and offer peace of mind. So, don't forget to add this essential knot to your adventure toolkit and embark on your next thrilling escapade with confidence.

24 -- Figure of 8 loop
The Figure-Eight Loop Knot: Your Trusty Companion for Adventure
When you're out in the great outdoors, whether climbing rocky crags or casting your line into a pristine river, a reliable knot can make all the difference. One such knot that adventurers swear by is the Figure-Eight Loop, known by various names like the Figure-Eight on a Bight, Figure-Eight Follow-Through, Figure-Eight Retrace, Flemish Loop, or Flemish Eight. This knot's distinctive "8" shape and its remarkable strength make it a go-to choice for securing ropes and creating loops in fishing lines during thrilling escapades.
Tying a Figure-Eight Loop is a straightforward process:
1. Start by folding a section of your line back on itself to craft a loop.
2. Bring the loop section back over itself.
3. Wrap the loop around the back of itself.
4. Carefully pass the end through the first loop.
5. Give it a firm yet gentle tug.
6. To prevent friction-induced melting, moisten the line with saliva.
7. Now, pull it taut with all your might.
8. Trim the tag end for a neat finish.
But this versatile knot isn't just for fishing enthusiasts; it's also a crucial component of prusik climbing when used in conjunction with a reliable climbing harness. The Figure-Eight Loop is the gold standard for tie-in knots in the world of adventure. It's easy to tie, doesn't necessitate a backup knot, and offers exceptional strength. In fact, it retains a remarkable 75 to 80% of the rope's full strength, ensuring your safety as you embark on daring exploits in the wild.
So, whether you're scaling breathtaking peaks or embarking on a fishing expedition in remote waters, make the Figure-Eight Loop your trusted companion. Its reliability and robustness are sure to keep you secure and ready for whatever thrilling challenges your adventure throws your way.

25 -- Figure of 8 double loop
Mastering the Double Figure 8 Knot: Your Adventure's Trusted Companion
When venturing into the thrilling realms of climbing, caving, or any adventure that demands secure connections, the double figure 8 knot, affectionately known as the "bunny ears," stands as your steadfast ally. This knot, designed to form two dependable loops in parallel, has earned its stripes in the world of adrenaline-pumping escapades. Whether you're scaling heights or delving into underground wonders, the double figure 8 knot has got you covered.
Unbreakable Bonds: The Double Figure 8 Knot
The double figure 8 knot is the embodiment of reliability, a true jam knot that merges two simple knots into a robust and immovable unity. It's a knot that knows no vulnerabilities, making it the top choice for attaching a fixed rope to two unyielding anchors. The adventure seeker's safety net, if you will.
Tying the Knot: A Step-by-Step Guide
Now, let's demystify the process of tying a double figure 8 knot. Follow these simple steps to ensure a secure connection that's ready to withstand the rigors of your next daring escapade:
1. Create a Loop: Begin with a generous bight of rope, and craft a loop with it.
2. Craft the "8": Pass the rope's end through the loop, forming an elegant numeral "8."
3. **Weave the End Through**: Take the rope's end and thread it through the center of the "8," securing its structure.
4. Open the End Loop: Gently open up the loop at the end, carefully moving it from the back to the front.
5. Navigate to the Right: Guide the end of the rope to the right, ensuring a snug fit.
6. Tighten Your Grip: With a firm hold on the end, pull it taut to complete the knot, locking it into place.
Beyond the Knot: Load Equalization in Top-Roping
The utility of the double figure 8 knot extends beyond its role as a steadfast connector. Adventure enthusiasts often rely on it to distribute loads evenly in top-roping techniques employing two anchors. This ensures that your safety is never compromised, even in the most demanding climbing scenarios.
In conclusion, the double figure 8 knot is more than just a knot; it's your ticket to safety and stability in the world of adventure. As you embark on thrilling expeditions, remember the bunny ears knot—your unwavering companion. Its strength, simplicity, and versatility make it a must-have skill in your adventure toolkit. So, tie it right, venture forth, and conquer the great unknown with confidence!

26 -- Figure of 8 follow through
27 -- Directional figure of 8
The "Directional Figure Eight" knot, also referred to as the "Inline Figure Eight Loop," is an indispensable tool for adventurers and climbers seeking to ensure their safety during exciting expeditions. This loop knot is not only versatile but also a reliable choice for bearing significant loads, making it a crucial asset in the world of outdoor exploration.
When properly executed, the directional figure eight knot forms a strong loop in the middle of a rope, capable of withstanding force in a single direction. It's essential to load this knot in the correct orientation to prevent any potential failures. Here are some adventure scenarios where the directional figure eight knot proves invaluable:
1. Creating Secure Handholds: Whether you're ascending a steep rock face or navigating tricky terrain, the directional figure eight knot can be used to craft sturdy handholds on a hauling line. This can provide much-needed support and stability during your adventure.
2. Z-Drag Attachments: In situations where prusiks (a type of friction hitch) are not available, such as river rescues or other demanding outdoor situations, the directional figure eight comes to the rescue. It serves as a reliable anchor point for attaching a Z-Drag system, enhancing your ability to handle challenging water crossings or other heavy-duty tasks.
Now, let's break down how to tie this knot properly for your adventures:
1. Create a Loop: Start by forming a loop in your rope, moving your hand in a clockwise direction to initiate the loop.
2. Elongate the Loop: Extend the loop to the desired size, ensuring it accommodates your specific needs.
3. Go Underneath: Now, come in from underneath the other side of the loop.
4. Tie Like a Figure Eight: Just as you would with a conventional figure eight knot, follow the pattern to tie the directional figure eight around the loop.
5. Secure the Knot: Pass the rope back down through the lower loop, creating a secure connection. Be sure to pull on the knot to ensure the strands align neatly and run parallel.
Incorporating the directional figure eight knot into your adventure toolkit can be a game-changer. It's worth noting that this knot has a notable mention in "The Ashley Book of Knots," a testament to its time-tested reliability in outdoor pursuits. So, as you embark on your next thrilling adventure, make sure you have the directional figure eight knot in your repertoire for added safety and peace of mind.

28 -- Flemish bend
29 -- Fisherman's knot
The Fisherman's Knot: Your Ultimate Adventure Companion
In the thrilling world of adventure and exploration, knots play a pivotal role in ensuring safety and security. One knot that stands out as a trusty companion for adventurers is the Fisherman's Knot. Known by various monikers such as the English knot, angler's knot, halibut knot, waterman's knot, and even the true lovers' knot, this knot serves as a robust link between two lines. Whether you're an avid angler, a climbing enthusiast, or a daring mountaineer, mastering the Fisherman's Knot is a skill that should be in your repertoire.
The Anatomy of the Fisherman's Knot
At its core, the Fisherman's Knot is a symmetrical gem, born from the fusion of two overhand knots. These knots are lovingly tied around the standing part of each other, resulting in a secure and reliable connection. Its simplicity is its strength; it won't jam or slip under strain, making it a steadfast choice for adventurers.
Versatility Unleashed
One of the most remarkable attributes of the Fisherman's Knot is its versatility. It can be your go-to knot when you need to attach a rope to a ring, hook, anchor, or any other object during your adventures. Whether you're deep-sea fishing, scaling rock faces, or conquering mountaintops, the Fisherman's Knot has got your back.
Tying the Knot - A Step-by-Step Guide
To tie this adventure-ready knot, follow these simple steps:
1. Begin by tying a loose overhand knot with the working end of one rope around the other rope.
2. Repeat the process with the working end of the second rope, this time around the first rope. Make sure to secure both knots snugly.
3. Now comes the crucial step: pull the standing parts of both ropes in opposite directions. This will seat the two knots together, creating an unbreakable bond.
A Word of Caution
While the Fisherman's Knot is a true adventurer's ally, it does have a preference – it thrives when used with ropes of the same diameter. Keep in mind that slippery rope materials can lead to jamming, making it a tad challenging to untie. So, ensure you're using the right materials for the job.
In your adventurous pursuits, having the right knot at your fingertips can be a game-changer. The Fisherman's Knot, with its strength, simplicity, and adaptability, is a knot that every adventure seeker should have in their arsenal. So, gear up, explore the wild, and trust in the Fisherman's Knot to keep you safe and secure on your daring escapades. Happy adventuring

30 -- double fisherman's
The Double Fisherman's Knot: A Trusty Companion for Adventurers
Are you an adventure enthusiast always seeking ways to elevate your outdoor experiences? If so, you've probably come across the double fisherman's knot, also affectionately known as the grapevine knot or double fisherman's bend. This knot is your go-to for securely joining ropes, creating loops, and handling heavy loads in activities like climbing, arboriculture, and search and rescue.
In this blog post, we'll explore the versatile and robust double fisherman's knot, providing you with a step-by-step guide on how to tie it and sharing some invaluable insights for your next thrilling escapade.
Why Choose the Double Fisherman's Knot?
Before we dive into the knot-tying process, let's understand why the double fisherman's knot reigns supreme in the world of adventure.
Unyielding Strength: Picture this – the double fisherman's knot can handle weights exceeding a whopping 5,000 pounds! That's the kind of reliability adventurers crave when pushing their limits.
Wide Application: Whether you're conquering challenging cliffs, navigating through dense forests, or saving lives in high-stress situations, this knot has your back. Its versatility knows no bounds.
Secure and Dependable: Once this knot takes on a load, it's like a steadfast companion you can rely on. It's notoriously tough to untie, making it ideal for crafting Prusik loops and ensuring your safety.
Tying the Double Fisherman's Knot: A Step-by-Step Guide
1. Coil the Free End: Take the free end of one rope and wrap it around the second rope not once, but twice. This forms the foundation of your knot.
2. Pass Through the Coils: Slide the coiled end back through the inside of the coils you've just created. It's like weaving a secure bond between the two ropes.
3. Repeat the Process: Now, grab the second rope and repeat the coiling process in the opposite direction. This ensures a balanced and sturdy knot.
4. Tighten the Knot: With both ropes securely coiled and passed through, pull the free ends of the ropes. As you do this, watch in amazement as the knots lock together with impeccable strength.
5. Slide the Standing Lines: Finally, adjust the standing lines (the parts of the ropes that are not free ends) to bring the knots snugly together. Leave at least 6 inches (15 cm) of rope coming out of the knot for added security.
There you have it – a foolproof guide to mastering the double fisherman's knot for your adventurous endeavors. Whether you're scaling cliffs, swinging from trees, or embarking on daring rescue missions, this knot is your trusted companion in the great outdoors.
So, gear up and get ready to conquer the wild with the confidence that the double fisherman's knot brings. Embrace the thrill of adventure, secure in the knowledge that your knots won't let you down. Happy exploring

31 -- Butterfly knot
Mastering the Butterfly Knot: A Versatile Knot for Adventurers
Intro:
In the thrilling world of adventure sports, knots can be your best friend, ensuring both safety and efficiency when the stakes are high. One knot that every adventurer should have in their repertoire is the Butterfly Knot, also known as the Alpine Butterfly Knot or the Lineman's Loop. This versatile knot creates a secure loop in the middle of a rope and can be tied without the need for access to either end, making it a valuable skill for climbers, hikers, and outdoor enthusiasts. In this blog post, we'll explore the practical applications of the Butterfly Knot and provide a step-by-step guide on how to tie it.
The Butterfly Knot in Adventure:
1. Equalizing a Belay:
One of the primary uses of the Butterfly Knot in adventure sports is equalizing a belay. When you need to distribute the load evenly between two anchor points, the Butterfly Knot comes to the rescue. Its symmetrical loop ensures balanced tension, enhancing safety during climbs.
2. Isolating Damaged Rope:
When you're in a remote adventure setting, dealing with damaged rope can be a daunting challenge. The Butterfly Knot can isolate the damaged section, preventing it from causing further harm. This can be a lifesaver when you're far from civilization.
3. Attaching a Third Person to a Rope:
Adventures are often best shared with friends, and there may come a time when you need to add a third person to your rope team. The Butterfly Knot enables you to create a secure attachment point, ensuring everyone's safety as you explore together.
4. Equalizing a Two-Bolt Belay:
Climbers often encounter situations where anchor points are unevenly spaced. The Butterfly Knot can be used to equalize a two-bolt belay, providing stability and peace of mind during challenging ascents.
Tying the Butterfly Knot:
1. Loop the Rope:
Begin by looping the rope over your open palm three times, starting close to your thumb. This forms the foundation of the knot.
2. Create the Loop:
Next, move the strand that's closest to your thumb over the other two loops, creating a central loop.
3. Secure the Loop:
Grab the loop that's now closest to your thumb, pull out a little extra slack, and move it over and then under the other two loops. This secures the knot.
4. Tighten the Knot:
Take the rope off your hand and pull the knot tight, ensuring it's snug and secure.
5. Dress the Knot:
To complete the process, dress the knot by pulling the two standing strands to the side. This ensures that the knot is neat and ready for action.
Conclusion:
In the world of adventure, preparation and safety are paramount. The Butterfly Knot is a valuable tool in your adventure toolkit, offering versatility and reliability in various situations. Whether you're a climber, hiker, or outdoor enthusiast, mastering this knot can enhance your confidence and security on your adrenaline-fueled journeys. So, next time you embark on an adventure, don't forget to add the Butterfly Knot to your skillset—it might just be the knot that saves the day when you need it most. Happy adventuring!

32 -- Sheet bend
Mastering the Sheet Bend Knot: A Must-Have Skill for Adventurers
Intro:
When embarking on thrilling adventures, having a versatile set of skills can make all the difference. One such skill that often goes underappreciated but is incredibly handy in the great outdoors is the sheet bend knot. Often referred to as the weaver's knot, the sheet bend knot is a trusty companion for adventurers, whether you're hiking, camping, or even sailing. In this guide, we'll explore the ins and outs of tying this essential knot for all your adventurous needs.
The Versatile Sheet Bend Knot:
The sheet bend knot is like a secret weapon for adventurers. It's the knot that bridges the gap, literally, by joining two ropes of different sizes or materials. Think of it as your ultimate rope connector. Sailors rely on it to secure sails, and it's the backbone of net-making. Its versatility knows no bounds!
Tying the Sheet Bend Knot: Step by Step
1. Create a Loop: Begin by forming a loop at the end of one of the ropes. This loop will be the foundation of your knot.
2. Pass and Tuck: Take the free end of the second rope and pass it under the loop's opening you created in the first rope. This step is like laying the groundwork for a strong connection.
3. Wrap and Secure: Now, take that free end and wrap it around both parts of the first rope, then tuck it back under itself. Imagine it as giving your knot an extra layer of strength and security.
4. Tighten Up: Finally, pull all four rope ends in opposite directions to tighten the knot. You'll feel the sheet bend lock into place, ensuring your ropes stay connected even in the most demanding adventures.
The Sheet Bend vs. the Square Knot: Why It's Superior
While the sheet bend knot bears some resemblance to the square knot, it has a distinct advantage – security. The sheet bend knot is designed to withstand stress and tension better, making it the go-to choice for adventurers. However, it's important to note that the sheet bend can loosen when not under pressure, so for added security, consider adding an extra turn in the smaller end to create a double sheet bend.
Knotting Legends and Challenges:
Believe it or not, the sheet bend knot holds a special place in the world of knot-tying enthusiasts. It's the very first knot featured in the Ashley Book of Knots, a legendary reference for knot aficionados. Additionally, it's one of the six knots highlighted in the International Guild of Knot Tyers' Six Knot Challenge. This knot's reputation among knot enthusiasts is a testament to its importance and versatility.
Conclusion:
As you venture into the great outdoors, mastering the sheet bend knot can be your ace in the hole. It's the knot that binds, secures, and ensures that your ropes hold strong when you need them most. So, add this indispensable skill to your adventure toolkit, and you'll be well-prepared for whatever challenges nature throws your way. Happy knotting, adventurers!

33 -- Double sheet bend
The Mighty Double Sheet Bend: Your Ultimate Knot for Uniting Ropes on Adventurous Escapades
When you're out in the wild, exploring the great unknown, one thing is for certain: you'll encounter ropes of varying sizes and strengths. That's where the double sheet bend comes to the rescue – a knot that's your trusty companion when you need to join two ropes with unmatched characteristics. Consider it the superhero of knots, offering a level of security that even the standard sheet bend can't match.
So, how do you tie this knot that's destined to be your adventure buddy? It's as easy as following these steps:
1. Start with the Larger Rope: Begin by creating a bight in the larger of the two ropes. This will be your starting point.
2. Thread the Second Line: Now, take the smaller rope and tuck it through the bight you just created. Think of it as a friendly handshake between the two ropes.
3. Wrap and Secure: Gently guide the end of the smaller rope around and beneath the bight of the larger rope. This is where the magic happens.
4. Final Tuck: It's time for the finishing touch. Tuck the working end of the smaller rope beneath itself so that both short ends are snugly located on the same side of the knot.
5. Seal the Deal: Hold onto the thick end of the larger rope and give those thin ends of the smaller rope a firm pull. Watch as your double sheet bend transforms into a secure, unbreakable connection.
But wait, there's more! The double sheet bend isn't just a knot; it's a versatile tool for adventurers. Whether you're constructing a hammock for a peaceful rest amidst nature or crafting nets for your survival needs, the double sheet bend has got your back.
And if you're wondering about the origins of its name, legend has it that the "sheet bend" earned its moniker from its early use as a means to secure a sheet to the clew of a small sail. Talk about a knot with a rich maritime history!
So, next time you find yourself in an adventure where ropes of different sizes and strengths need to unite, remember the double sheet bend – your dependable ally for all things daring and outdoorsy. Happy knotting, fellow adventurers!"

Comments
Post a Comment